Showing posts with label Chibitronics. Show all posts

Thursday, October 26, 2017

Throwback Thursday: Ghosts of the Past


Ok, so today's post is a bit of a cop out, I admit it.
This is not a completely new blog post with a new project.

However, I have gone back through the archives of Sometimes Wy to dig up some useful Halloween inspiration that you might have forgotten or overlooked.

These are a few ghosts of the past come back to haunt this years Halloween marathon.
This may be the beginning of a new life for the Throwback Thursday post...like a corpse rising from the grave.

So here's the first throwback.
Remember this:
It was posted October 14, 2012 under the blog post title, "Wanted: A Little Courage". Strange about going back and reading these old posts. Some of the things I've written then are the same today. Check out the full post, if you're interested in the memories. Just scroll down to the photos, if you're interested in seeing how I put this tag together. In case you were wondering, yes, I still have this tag.


So here's another project near and dear to my heart.

This was posted on October 23, 2013 under the title, "Poe's Nevermore". It's the cover of a composition notebook that I altered. (and subsequently sold at a craft show) Check out the old blog post to see some of the old supplies I used and to see the back cover and more detailed photos, if you so desire. This was really the inspiration for my Poe Canvas series.

How about this one?
This blog post is from January 27, 2016, not too long ago. It is titled quite simply, Chibitronics: Paper Lanterns.


This blog post fits in here because I always thought I'd make these at Halloween time. The Chibitronics LEDs and copper tape allow the lanterns to be battery powered. Thus, they can be hung anywhere! Though, the post shows blue lanterns, these paper lanterns come in many colors and I currently have green ones in my hoard that would be good for Halloween or for an Alien Invasion party.
I admit that the post is lengthy and may seem intimidating but honestly, the circuit I devised is wickedly easy to make. The crux of the complexity comes in the removal of the inner core frame of the lantern itself.
(I'm also making note of the post as I will need it to complete the green ones. This recent link will make it easier to find later for me!)

So that's Throwback Thursday for the Halloween Marathon. Thanks for stopping in!
New Halloween post on Sunday and then hopefully, on Tuesday...Halloween Day!
Thanks for joining me throughout the month.
-Wy

Wednesday, January 27, 2016

Chibitronics: Paper Lanterns

Note: This post was originally written last Fall but I didn't post it. Since I'm short on time, I'll post it now. Enjoy!

This is so EASY. I love how these paper lanterns can be hung up ANYWHERE. Seriously, a paper lantern that glows on a battery so you don't have to worry about cords or lines. Hang 'em outside in a tree for a great backyard party!

I have always loved paper lanterns and when they light up, I get all giddy inside! I used the components from the Starter Kit at Chibitronics to make a super simple circuit that you can slide inside the lantern to light it up with battery power! The best part is that the circuit is super simple, it can slide in and out of the lantern, and the top binder clip becomes a hook that you can attach a line to to string it up!


You'll need these items to get started and this makes ONE paper lantern.
Paper lantern (with metal frame)
cardstock
copper tape
5 LED stickers (white)
3V lithium flat battery (1)
binder clip
exacto knife
ruler 
pencil
 

I bought my paper lanterns at Oriental Trading Company. I got blue but they come in a variety of colors and the small ones are about 5" in diameter. These paper lanterns come flat and they have a metal frame that gets inserted down the center to hold it open. This metal frame has a loop extension (used to attach a string to hang it up) and this is the important part. This loop is what is going to hold your circuit inside the lantern.

See that metal loop in there? That's what you need. I'm not sure if all brands or sizes of paper lanterns have this so be sure its there. It makes this project quick and easy. Here's how it works:

1. From the cardstock, cut a piece that's just smaller in width than your metal frame, about 1 inch wide and 1 1/2" longer than the frame. You want a piece of cardstock that will nestle inside the frame but be longer so you can fold over the top to hold the battery. Like this:

These are the front and the back of the cardstock with the circuit already on it.
2. You need to make your fold at the top of the cardstock to hold the battery. Just tuck the battery in there and fold over it. Then, remove the battery and crease the cardstock well.
3. Make a slit in the cardstock with an exacto knife. The slit should be big enough for that metal loop to slide through and it should be positioned just under the flap when closed. (You can see it in the second photo above. It's that hole just to the right of where the copper tape ends.)
4. Make your circuit. Using the copper tape and LED stickers from Chibitronics, assemble your circuit. This is a straight forward circuit, nothing fancy. Just lay the copper tape from the negative side in a straight line and fold over to the back. Do the same with the positive battery line. Just make sure the tape doesn't cross or touch anywhere.
Once you have added the LED stickers, just add the battery and fold over the flap. Add a binder clip to hold it closed and the lights should come on. (If they don't, or one or two are flickering, you just need to make a better connection between the light and the tape. I press them down with a bone folder to make sure the stickers are stuck on. I may need to add another piece of copper tape over the top of the sticker if my gap between the parallel lines of tape is a bit too big.)

5. Now that you have this piece, it's just a matter of assembly. Put the metal frame into the paper lantern. Add your circuit by slipping the cardstock down the center and sliding the metal loop at the top of the lantern through the slit in your cardstock. The binder clip is now your hangar and the lights will stay on as long as the clip is in place.
REMEMBER: if you remove the clip, the battery will fall out as it is not attached to anything!

To disassemble the lantern, just remove the circuit first. Unhook it from the loop and then pull it out of the lantern. Once removed, you can take off the binder clip and remove the battery from it. Then, you can remove the metal frame from the lantern to fold it back down flat. All these pieces can then be stored away and used again!
Wasn't that easy?!
Now you can really get creative! You can decorate the outside of the lanterns for extra pop. You can dangle streamers from the bottom of the lanterns for a bit of movement or to make these small lanterns seem larger. These would liven up any party! Personally, I'm thinking of orange ones with jack o' lantern faces for Halloween!

You can find the light stickers and circuit supplies at Chibitronics to turn your ordinary paper lanterns into something extraordinary.

Have a great week!
-Wy

Monday, November 09, 2015

Blame the Machines (Canvas)

So the St. Lawrence County Arts Council put out a call for submissions for a work inspired by music. Now I am always listening to music while I work unless I'm working at a table with other people. (Then, there's just general talking and mumbling to myself.) I even did an entire Art Journal inspired by the random tunes that came up on my ipod as I sat down to create. (You can see some of the posts for the Sing Song Art Journal. Here,  Here, and Here, also Here, and finally, Here. Whew.)

While I did consider some "classical" tunes, I don't listen much to that while I create. I have an eclectic assortment of tunes on the ipod; everything from 70's disco to show tunes, to rock/pop, to country. I like what I like but primarily I'm an 80's girl and that's MY music. So when this topic came up, I immediately thought of making a piece with neon colors like way back when.

But then; this song. And it wouldn't leave me alone.

"Blame the Machines" by Duran Duran. The same Duran Duran of the 80's. The "Rio" and "Hungry Like the Wolf" Duran Duran. "The Chauffeur" and "Electric Barbarella" Duran Duran. The Duran Duran of the later "Ordinary World". In 2011, they released the album, "All You Need is Now" with 9 awesome new tunes and this one, "Blame the Machines", is infectious. I can't get it out of my head. Listen Here.
(You can scroll down under the song titles and find it.)


"I'm driving up the autobahn
losing my way as the night gets long
These headlights shining in my face
scream out the danger of this place.

And now there's no way home
this love affair has ended
I should have known when I bought into the dream
So like your sonic soul
to leave me lost and stranded
I blame myself and
I blame the machines."

"And now
 turn left.
I have
control.
You are not
required
to think
at all."

It's this last bit, the British girl's voice, like the calm, controlled GPS directions that gets me. In that short little discourse (that isn't even sung) lies the truth of the whole. But can we blame the machines? Or is it our own dependent nature that's to blame? Can we no longer think outside the box? Will we allow the machinations of a technologically dependent world crowd us into smaller spaces and direct us on how to live our "normal" lives?

Truly, the love affair has ended.

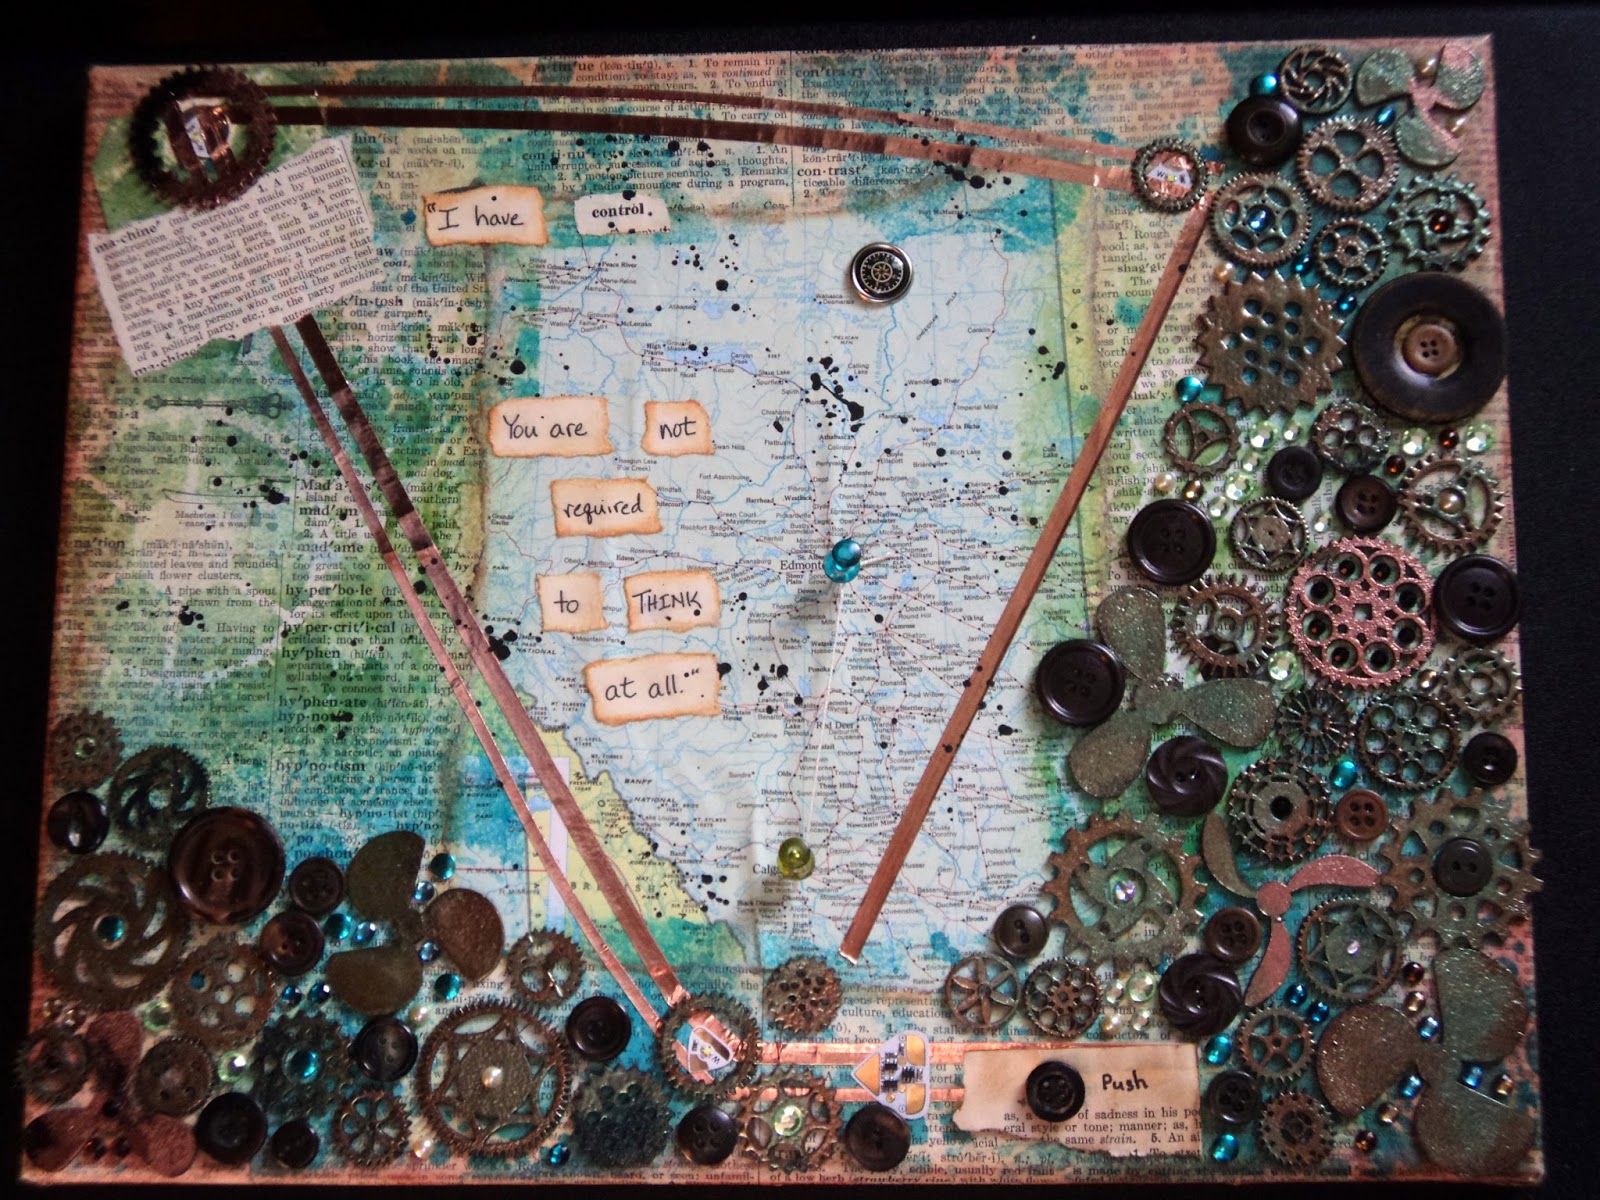
So here's the canvas that I created that was inspired by this song; Blame the Machines.

This canvas measures 11 X 14 and was one of those bulk, pre-gessoed canvases you buy at Michaels. I collaged dictionary paper and an map (Canadian province of Alberta) to it then added some spray inks in teals and greens and a bit of copper.

I added Chibitronics LED stickers and copper tape to make a triangle. I added in a special effects sticker as well to make the lights pulse like a heartbeat. (It's ALIVE!) Once I had my circuit connected and functioning at the push of a button, I moved to the embellishments.

I used a variety of rhinestones, buttons (in black and brown), a few pearls, but mostly chipboard gears from Creative Embellishments. (I was over the moon about these gears...they were exactly what I was hoping for. Check out the website for every kind of gear you'd need.) I used three sizes of gears and jazzed them up with embossing powder from Lindy's Stamp Gang. I used Byzantine Bronze and Reindeer Moss Green. I experimented with other combinations but this was the one that worked best for my look. I just covered the gears with Versamark ink and poured on the powder and heat. It was super hard to get a good photo so you'll have to make do with these.

 I attached all the embellishments with Multi Medium Matte (Ranger). Lastly, I added my quote from the song and the push-pins and twine. (It's not exactly the autobahn but Edmonton to Calgary.) 
The flat 3V battery attaches via a strong magnet under the "push" button. It stays in place and it can be removed to reserve its power or to be replaced. When the button isn't pushed, the lights do a pretty good job of staying off. A stray breeze may make the connection when the battery is in place and light up the canvas inadvertantly...or maybe the spirits just wanted to have some fun.

Thanks for checking it out!
--Wy
"Necessity is the mother of invention."

Tuesday, September 08, 2015

Chibitronics: The Glass Bowl

I'm not quite sure what to call this home decor creation. I REALLY like it. WARNING: This is a lengthy post with directions as to how I made this...or you can just look at the photos by scrolling down.  The basics: Alter/color clear glass bowl; add circuit and battery inside; glue to clear candlestick holder; add glass pebbles inside; tie ribbons around the top lip; done. Here's what I made:


This wasn't too difficult to make so long as you have little hands! :)  The lights and the copper tape are toward the bottom of the bowl on the inside and there's just no good tool to get it in there except your hands. The LED stickers and copper tape are from Chibitronics. Love these stickers. There's no cord to plug in which means this decorative bowl can sit ANYWHERE. And no candle or open flame to worry about.

This piece is actually two separate pieces glued together and decorated. I got both of them at a thrift store and garage sale for about a buck each. The bowl was just clear glass and the "pedestal" is actually a candle holder.
So here's how I started:
1. The Glass Bowl:  I learned a technique for frosting glass and adding crackle texture. I used it on the bowl. I covered the bowl first with Glue-N-Seal from Ranger. (This is like a decoupage medium. I have heard you can do this with other things like ModPodge but I haven't tried it.) I put on a thick coat but not so thick that it would run or clump while it dried. It's pretty thick stuff and clings very well. Once that coat was dry, (I let it dry overnight.) I added Distress Crackle Paste (Rock Candy) which is a clear crackle medium. To get good "cracks", apply a coat like you did with the Glue-N-Seal. This stuff is a bit thinner and will tend to pool so check on the bowl periodically to turn it over. I let it sit on it's bottom then shifted it to sit on the top and kept flipping it as it dried. When it dries clear, you'll see the crackled pattern and notice that the glass doesn't look as "frosted" as it did after you applied the glue. 
NOTE: You may notice at the lip of the bowl the glue seemed to start to peel away. That's due to the crackling medium. It is still attached but if you scape at it, I'm sure it will come off. So this is a "handle with care" piece! (I wasn't too concerned as I planned to cover it up anyway.)

2. Add Color:  After the bowl was completely dry, I added alcohol inks to color it. (I used Adirondack alcohol inks from Ranger.) I went with a few blues to give it an ombre look. You need to add the ink to the outside because it won't stick to the glass on the inside. It only sticks to the mediums that you've applied.
3. Add circuit:  To make the bowl light up, you need to add a battery, copper tape, and LED stickers to make a circuit. (All can be found as part of the Starter Kit from Chibitronics.)

The photo above shows the completed circuit inside the bowl. I created a battery "pack" from a folded piece of cardstock. I glued a strong magnet to the underside so it will hold the battery in just the right spot. I just added the tape from that to the sides of the bowl. I added my white light stickers and then the battery to test it out. When the flap is down, the lights come on!

4. Attach bowl to candle stick holder.  As I stated, the pedestal is just a clear glass candle stick holder. After I was sure the circuit worked, I attached the bowl to the top of the candle holder with E6000 glue. I applied it generously and let it cure overnight. I had to keep the bowl stable on it's open top and add some weight on the whole thing to be sure of a good bond. (I just used an acrylic stamping block to balance a bag of glass pebbles on it. So the bowl was upside down with the glue holding the candle holder, then I put a large acrylic block on the bottom of the candle stick. Then, I balanced a baggie of glass pebbles on the block for weight.)
5. Add some weight.  In order to hide the battery pack and to keep it lit, the bowl should be filled with some glass pebbles. You can find the clear ones in just about any dollar store or in a craft store with the fake flowers. I got mine in a thrift store for under a buck.

You may want to add the pebbles all together in a bag so it's easier to get them out to add/change the battery. So long as the pebbles are in there holding down the top of the battery pack, the lights will be on. It also helps to protect the LED stickers from getting dislodged or broken. The pebbles can be any color but the clear ones reflect the lights very well!

6. Add some ribbon.  As a finishing touch, I glued down several different ribbons around the top edge of the bowl. I made one long enough to tie into a bow.

When lit, you can see the light reflect off the pebbles and the color of the ink. You can see some of the copper tape and the back of the lights as small yellow dots. I love how it looks all lit up in the evening.


So check out your local thrift store for some clear glass to alter and color. You can match your own home decor and then make it light up!

Have a great week!
-Wy

Friday, August 07, 2015

Chibitronics: Inspiration Art Journal Page

I got to sit down this past weekend and get my latest Inspiration Wednesday Journal page completed. I didn't go exactly the way Donna Downey did in her journal but then, I don't need a bunch of texture in my pages...I prefer color. As I worked on the assignment, I had my Chibitronics kit in arm's reach as I was working on some other projects with it. I just went ahead and used it. I mean, why not? So my art journal page lights up with battery power!

Red Heart Page:  It's so easy to incorporate the Chibitronics LEDs into the journal because you can set it up just like the starter kit journal! The folded corner is where the battery is and you can see my red LEDs lit up in the corners of the patterned paper. I used the heart that I cut out from the middle on the facing page spread. The background is Dylusions inks, stenciling, rubber stamping, and some splatters.

Overall, I kinda like the page. I LOVE the lights...they work great! The background probably could have used a few more layers or perhaps, the addition of another color. This is the first project I've done with the Chibitronic LEDs where I haven't hidden the "circuit". I like the look of the copper tape as an embellishment, and I have a plan for a future card done in this manner.

Here's a photo that shows off the lights a bit more:

If you're interested in trying out these LEDs in your craft projects, you can find them at Chibitronics along with some ideas on other ways to use them.

I hope you found a little inspiration for your art journal! Have a great week!
-Wy
"Lightness has a call that's hard to hear."  --The Indigo Girls, "Closer to Fine"


Tuesday, June 16, 2015

The Firefly Card

Seems like forever since I had a project to share! Every day I've had available to craft, I've felt...not-so-good. But finally on Sunday, I got something done! And bonus!...it lights up! I'm linking this project up to the Lawnscaping Challenge, too!)

Chibitronics makes it possible. I am having a fun time with my Starter Kit and a few extras. Check out their site for great ideas and see what's possible. I highly recommend the Starter Kit! It has all you need to get started and to make this card. (Except the strong magnet. Those magnets can be found HERE.)
I highly recommend reading the Sketchbook from the Starter Pack for more detailed info about how circuits work and can be designed. It's far too much to include here. But the directions in the Sketchbook are easy to understand and take you step by step through making your own circuits.

Here's my finished project:

I used Lawn Fawn stamps from the Critters in the Burbs set and from Summertime Charm set.
Light up cards aren't hard to make so long as you plan it out first. The stamped portion of my card is a separate panel that I attached to the card base so I could hide the circuitry.
In a nutshell, you need only a few things to make a light-up card: a power source (battery), a conductor (copper tape), lights (LED stickers). In essence, you connect the positive from the battery to the positive on the light via copper tape. Same with the negative. Don't cross them...you'll get a short circuit. That's the basics.

Here's the process:
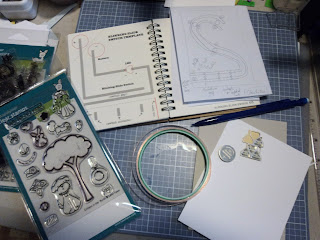
1. I gathered up my materials. I basically pulled out my Chibitronic Starter Kit, some stamps, a card base and extra panel, a pencil, and adhesive. My idea was to stamp a night scene with fireflies that would light up. I sketched out a little scene on scrap paper so I had an idea of how the finished card would look.

2. Sketch out a "skeleton". I call the internal circuitry, the skeleton, of the card. I didn't want all my copper tape to show and I wanted the small LED lights to shine through the paper/cardstock. The photo above shows my first attempt at sketching out the skeleton. It wasn't going to work. The left side shows a page from the Sketchbook that comes in the Starter Kit...it was what I wanted. A Blinking Slide Switch. So when you run your finger along the bottom of the card; the LED sticker lights would blink on then off then on...
(The card doesn't end up this way because I goofed it up. I'll explain some at the end of this tutorial.) The above sketch wasn't going to work so I tried another sketch as seen below.


3. Plan out your lights.  I stamped out where I wanted the fireflies to be (those round circles) and penciled in lines to connect them. I need a continuous line for the negative. I need two lines for the positive because that is where I'll place my switches. The negative line will run from the battery through the lights then end on the front. One positive line will connect all the lights and then form a line along the bottom of the card. The other positive line will run along the bottom of the card and connect to the battery. (The actual switches will be added later. They go on the back of the front panel.) The lines are going to be my guide for laying down the copper tape. They trail off the edge of the card front because the battery is going on the inside of the card. So the tape has to wrap around to the other side.


4. Lay down the copper tape. Following the lines of the skeleton, I laid down the copper tape. (Refer to your Sketchbook for tips and tricks on how to lay it down.) I just followed the lines making sure to keep it continuous. I used the outline of the LED stickers to approximate how much space to leave between the positive and the negative lines. The LEDs need both lines to touch so make sure not to leave too much of a gap. You also don't want the positive tape to touch the negative tape or you'll have a short circuit.
 

5. Connect the tape to the battery. The copper tape has to wrap around the edge of the card in order to connect to the battery. Just wrap it around to the inside of the card and end them. I like to trace around the battery so I know where it's going to be placed. The battery is placed along the fold of this card so the tape hits both the positive and the negative when the card is shut. THAT will power the lights.
6. Test the circuit. I always test the circuit when I've got it done. So I add the LED stickers to my preselected locations making sure the positive end is touching the positive tape and the same with the negative. Once my LEDs are secure, I add the battery to the inside of the card and close it. Because I have a SWITCH in my design, the lights will only get power when the gap is bridged by copper tape. So to test, I laid a small piece of tape along the gap where I can press.
 
I placed the blank panel over the top of the card and pressed. The LEDs lit up! Circuit is good to go.
With the skeleton complete, I can now work on the front panel of my card.

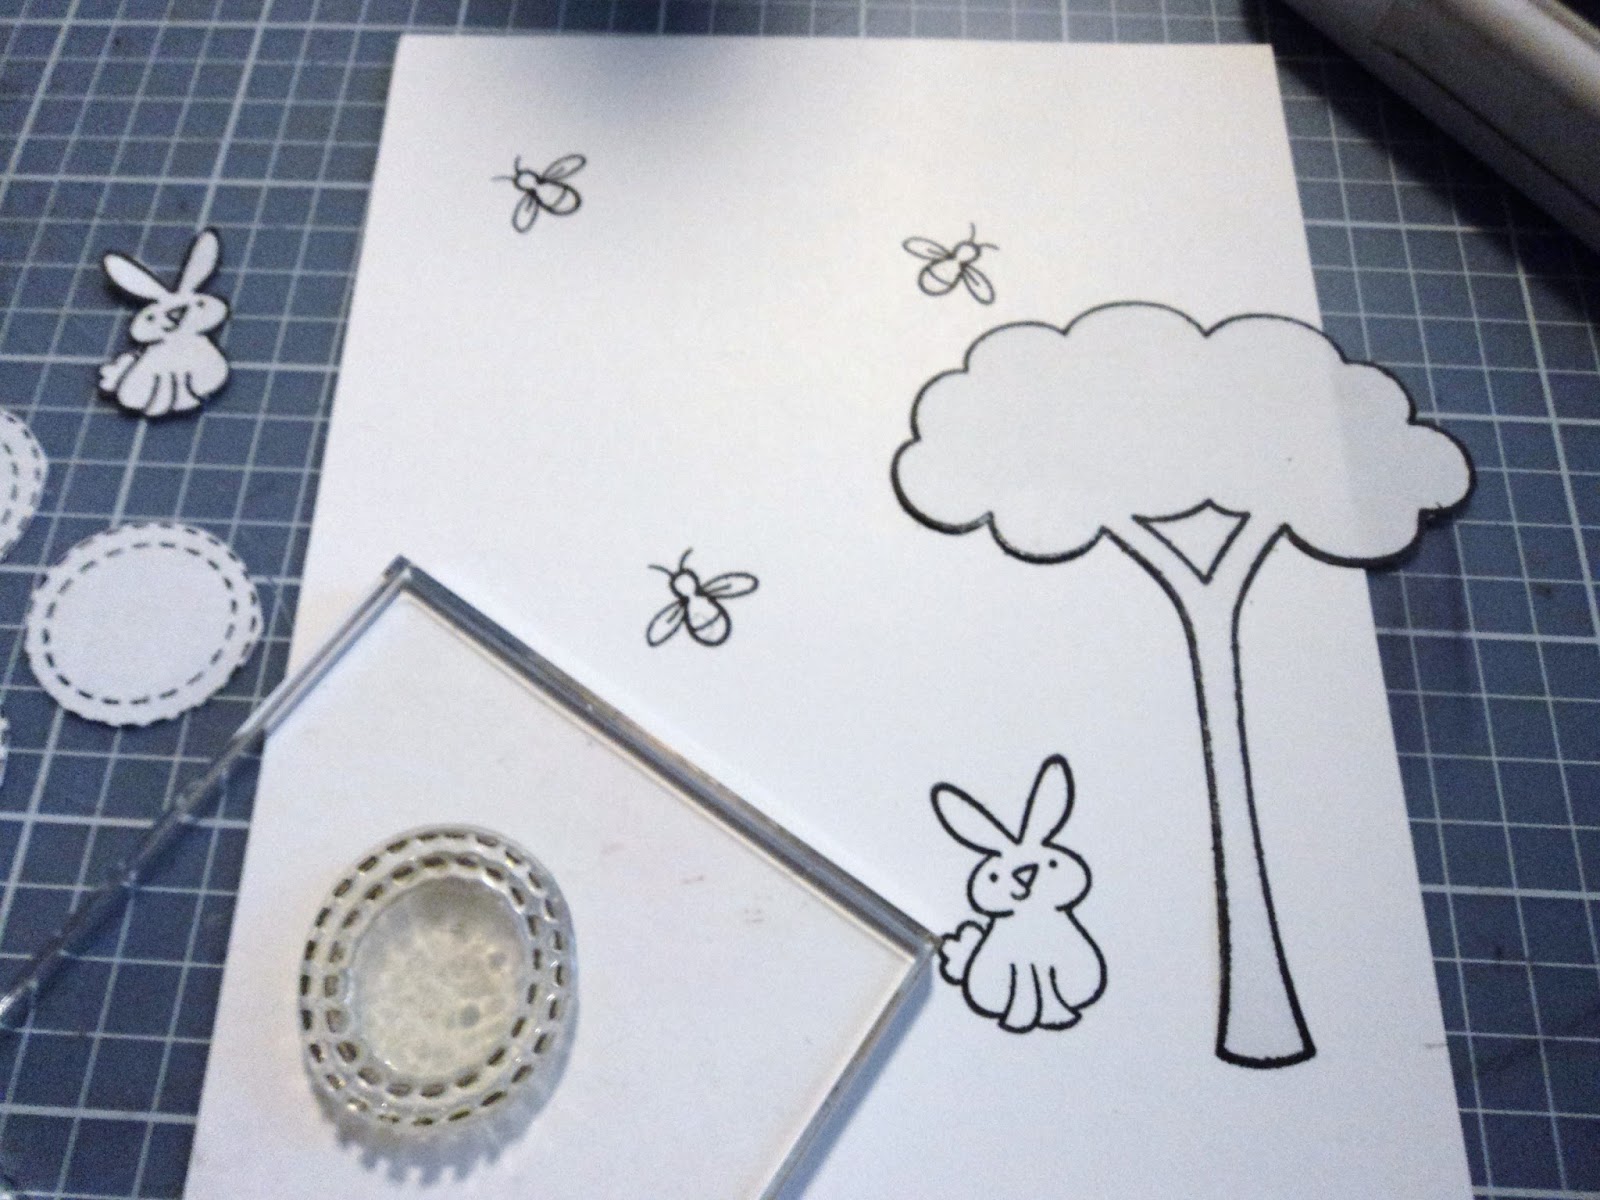
 7. Position the fireflies. While the test lights were on, I made a little circle with my pencil as to where they showed up on the front panel. That's where I want to stamp my fireflies so that they are aligned with the LEDs underneath the panel. Once I had those stamped, I just positioned the rest of the stamps around them. I cut masks for all the stamps; the tree, the bunny, and the circles. I was going to ink the background and I wanted these places to remain white so I could color them in. 

8. Ink background. With the masks in place, I began to ink the background to make my night sky. I started with Distress Broken China, then added Midnight Muse (Stampin Up!) (Distress Chipped Sapphire would also work here!), and finally blended a little Distress Black Soot just along the upper edges. I used a sponge to apply all the inks directly to the front panel.


9. Remove masks and color. Once my background was the way I liked, I pulled off all the masks being careful not to get my inky fingers onto the white areas. Then I colored in the images with Distress markers. I added a strip of green patterned paper to the bottom to give a horizon line and to house my sentiment.

 10. Attach panel to card. It was time to add the switches. Switches are just little pieces of copper tape added to the back of the FRONT PANEL. So when the front panel is attached to the front of the card, the tape can be pressed into the gap to complete the circuit. Once my scene was complete, I added double stick tape along the edges of the back of the front panel and lined it up with the card front. Once I added my battery to the inside, and pressed along the sentiment, the fireflies all lit up!


So here's my Ooopsy: remember when I set up my circuit it was supposed to make the fireflies blink? Well, that didn't happen. I believe I placed the switches too close so that when I pressed the first, it also connected the second so the fireflies never blinked off as I ran my finger along the edge of the card. But hey, it's a learning process and I like the card as it is. They light up fine!


 11. Attaching the battery. The battery just has to make contact with the copper tape. When the card is shut, just holding that corner will make that connection. I added the small magnet to the back of the card to hold the battery in it's proper spot. That magnet holds the battery to the inside of the card so that it doesn't fall out. I then taped the magnet to the back of the card so it wouldn't shift in an envelope.
Lastly, I just added a few stars to the sky with a white gel pen.


Whew! Finished!
This card is a real show stopper. Although I goofed up my blinking switch, I still love the card and it lights up so wonderfully. Photos can't do it justice. These little LED lights add a Wowza to an otherwise simple little card.

If you want to recreate this card, you can find all the things you need for any light-up project at Chibitronics. The Starter Kit is well worth it and you get enough supplies for several projects!

I'm planning out my next light up adventure already...perhaps a paper lantern or maybe a banner? Hmmm...
Thanks for dropping in.
--Wy
Lawnscaping Challenge #108: Stars and Stripes


Monday, May 04, 2015

May the Fourth Be With You

More light-up activity in honor of Star Wars Day, May 4th. (You've gotta be a Star Wars nerd to get it!)

I made a card for my bro, Jackbear. (You can find him carving rubber stamps over on his blog, Jackbear Stamps. He's got something to share for the day as well!)

Here's the card:

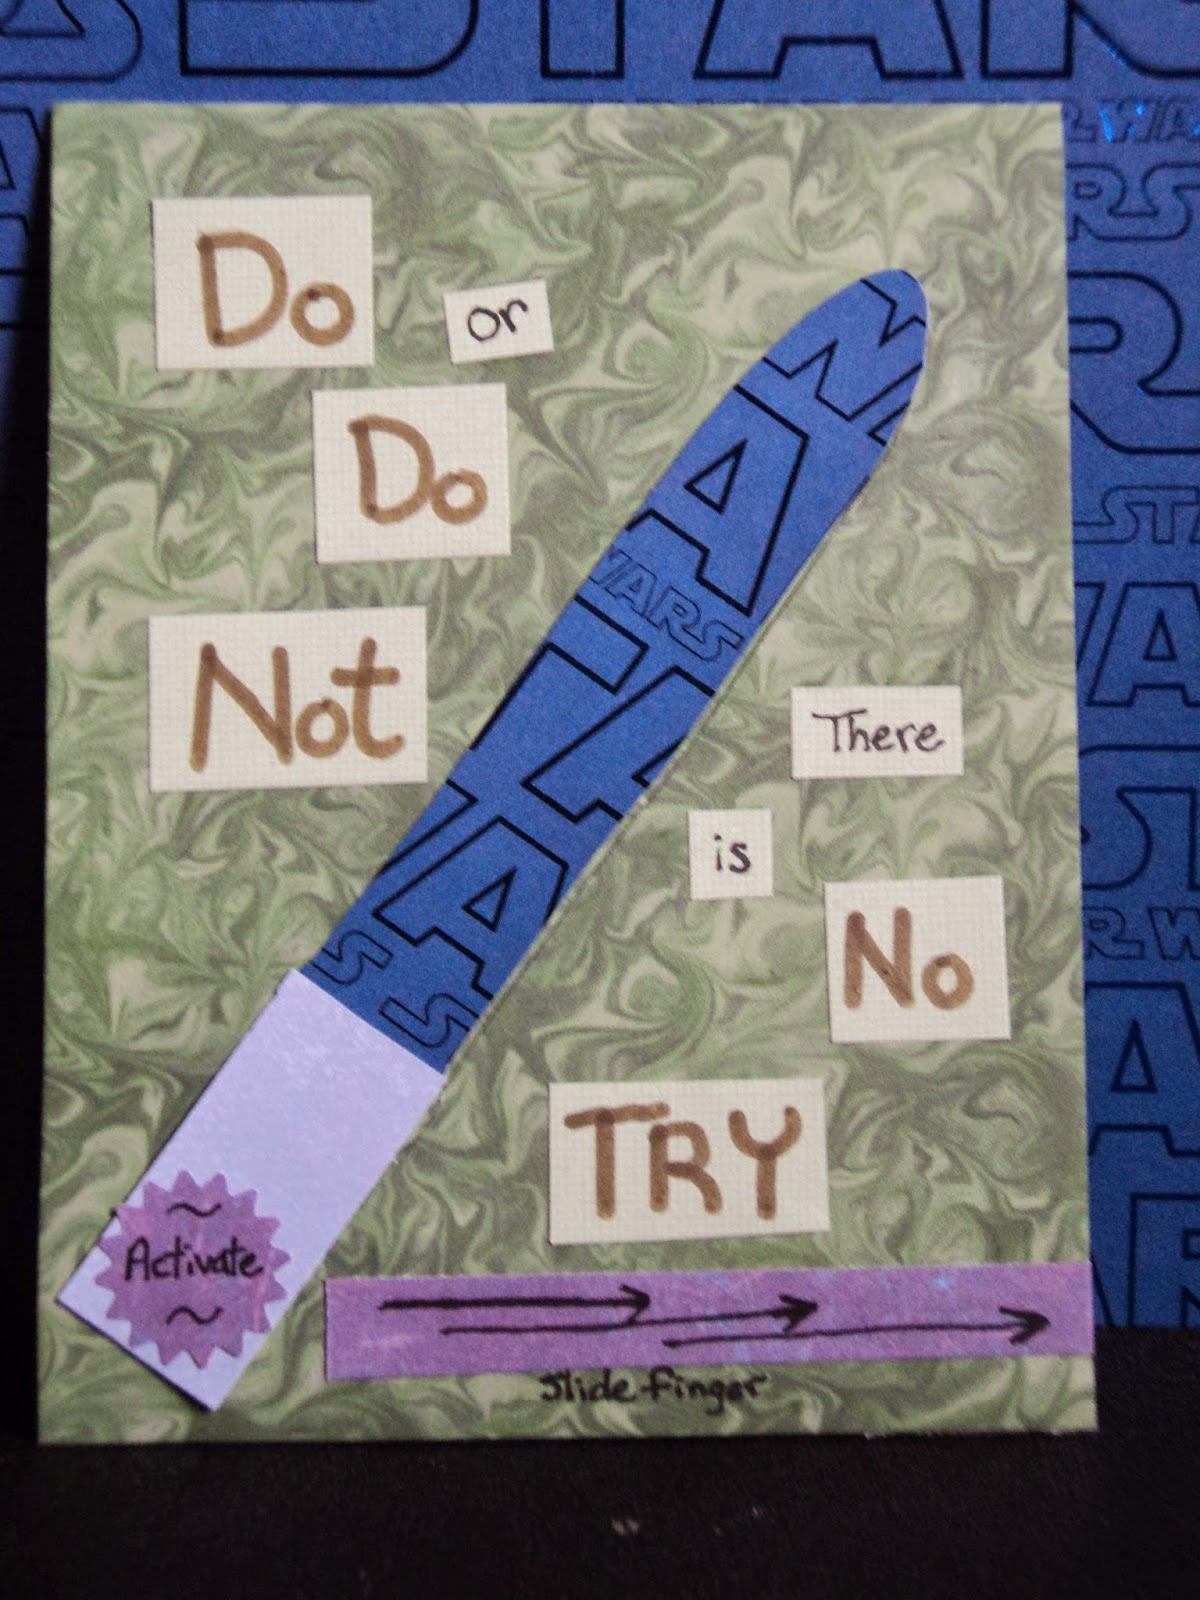
Master Jedi Card:  The photo above is the front of the card. The card doesn't open but the back of the card is below.


First off; I create things for my family that may not be perfect. My drawing skills aren't the best (I may be just a tad better than my 5 yr old niece, but not by much.) But I know that my family admires the "TRY". Better to try it than to succumb to a store bought. And honestly, the mechanism makes up for the less than perfect artwork. That's because this lightsaber really lights up!


That's right! I used more Chibitronics inside of this card! There's my copper tape and LED sticker skeleton to this card. I had to sketch this one out a few times before I figured out exactly what I wanted. The lights had to come on in sequence. But the starter kit led me in the right direction.


I used white LEDs here as the paper I chose for the lightsaber is blue and it lends that color to the lights when they activate. Rather than try to write out an explanation about how to make the lights come on, I just left a question on the back of the card for my brother. I'd see if he could figure it out from the little prompts I left on the front of the card. I thought it was very much in theme with the quote, "Do or Do not; there is no try."

Hope you liked my project and come back again for more!
Happy Star Wars Day to all my nerdy friends!
-Wy
BTW: I am sorry that my "light-up" photos aren't the best. It's hard to balance a camera and activate the card single handed.
AS WELL: I am also aware that a lightsaber is a fallic symbol and my shoddy drawing skills make that apparent. But it's a lightsaber, really.


Wednesday, April 22, 2015

The Ultimate Bling

I was a scrapbooker for over ten years but moved on to card-making in a newer digital age. I continue to make cards but have also added collage and mixed media to my repertoire. The challenge I face now in my card making is how to make UNIQUE cards. I think I've found something that fits the bill.

I have never been much into "bling" on my cards. I will use rhinestones and pearls a bit, maybe some sparkly embossing powder or metal touches but never Glitter. I do love a metallic shimmer or a pearlescent glitz but glitter and flocking and foiling...eh...not so much. Even this new trend of Gold Foil Everything is just not my thing. But I have found a bit of bling that even I can get behind.

I've seen the light.

Or rather, I've discovered the lights...the sticker LEDs from Chibitronics.

Yea, baby.

Wanna see?

Awesome!

Blue-eyed Robot:  I took the photo above in low light in order to show off the main feature of this little card and that's the light-up eyes. My finger is pressing down on the card to make the eyes light up. Stinkin' cool, ain't it?

Here's a few more photos of the card in various stages and how I made the card. For greater detail as to how the circuit works, go to Chibitronics and review their cool videos. They have a basic starter kit (which is what I have and used!) with straight-forward directions that can get you going in the right direction.


Step 1:  Make a side-folding A2 (4.25 X 5.5") card from white cardstock. Stamp robot image on the front. On the inside of card, stamp the image again in the same place as it is on the cover. (You could use some kind of stamp aligner here like the Misti tool or a stamp-a-ma-jig or you could measure it.) You now have a card with the exact same image on the front and the inside.


Step 2:  Now you need to set up your circuit, lights, and switch. I just followed the handy guide in the Starter Kit which gave me insight as to how a circuit works, what the lights need, and how to add a switch. Place your LED stickers where the eyes need to go. I had to trim my lights to get them close enough together so that he didn't appear to be looking one way. (I didn't do a perfect job but it's as close as the lights can get and still work.) To trim, I just used scissors to cut the pointy end of the sticker along the pinholes that are already there.


Step 2-A:  Part of this step I actually did while planning my circuit and the other part was an afterthought (which really should have been in the planning!). I planned where my battery was going to be. You need to connect both the top (+) and bottom (-) of the battery to the circuit (the copper tape) so the battery needs to be placed on the fold. So when the card closes, the card has it's power source. (Again, go to Chibitronics to find out more.) Where I should have planned was in the switch. In the photo, you see a piece of copper tape on the inside opposite my main circuit. That is my switch. When that piece of tape connects to the circuit, the lights come on.


Step 3:  Decorate your card front however you would like. Color in the images and add any embellishments you want at this point. I colored in with Distress Markers and finished stamping a border around the edges. I also attached the battery to the inside of the card. I just glued it down, careful to avoid the copper tape connections. The binder clip holds it in place. I added double sided tape around all the edges and effectively taped the card shut. I didn't want my circuit to show or my card to open. So what would normally be found on the inside of the card would be on the back. (kinda like a postcard)


So when the card is finished, it looks like this. Pretty cool. But you can make the robot come alive!
When holding the card, if you hold it in the lower left corner (where the battery is), and pinch the card in the middle (about where the robots buttons are), you can make the eyes light up. Or you can lay the card on a table and press both places to do the same.


I added the switch to my card so the lights wouldn't always be lit up and drain the battery. In my small tests, before everything was taped and glued down, it seemed that when the card closed, the lights came on because the connection was complete. After everything was glued down, the lights didn't come on...and I realized that the battery wasn't making a proper connection to the copper tape. Hence, pressing in two places rather than one. But it's pretty easy to correct and since this is my first time using these cool effects, I'll chalk it up to a learning process.

I honestly can't wait to make my next one!
--Wy
"It's alive!" ---Dr. Frankenstein, from the movie.

Featured Post

The Chocolate Game

 Let's talk about something sweeter than my other blog posts of late. Let's talk chocolate. But no guarantees that anything I want t...