Showing posts with label interactive. Show all posts

Saturday, February 10, 2018

Saturday Scrap: Cards

I admit that I love uniquely folded greeting cards and interactive cards.

I also admit that I don't like to make them. At least, not a bunch of them.

That's probably why I ended up with a bunch of pre-scored, pre-cut cards that are designed to be more elaborate than your everyday fold. I bought a bunch of these template cards from Paperwishes last year and hardly cracked one pack open...until today.

Today, I decided to use up those templates before I did anything else. And there's no better way to get going on a project than with the scraps left over on your table.

So enjoy the photos.

This first bunch was called Center Fold Cards. I'd actually do these again because it was pretty easy to cut the pieces and there were only 3-4 pieces. So these might be on my re-order list.


I can't remember what the next card is called but I do know that my sister knows how to cut this and fold it. That being the case, this next style is not on my re-order list. I didn't much like making it as there just seemed to be too much real estate to cover, if you know what I mean.


I made another one of these but it didn't photograph too well.

I also made some Pop Box cards...actually, I have no idea what they're called. It's a card that pops up into a box that has little doodads sticking out the top. Well, you'll know what I mean when I photograph them. (I can't share one of them till later this month. It's a birthday card for my brother who reads the blog!) Anyway, I still have one more of those to do. Those are a template I may re-order as well. I really like the form and it's only a square that needs to be cut.

I made other cards, too. I felt like I was on quite a roll. I'll share those in another post.
It felt good to use up some of the stash!
Have a great weekend!
-Wy

Thursday, February 11, 2016

The Art Journal: Almost Done

This is the Big "Inspiration Wednesday" Dylusions Journal from last year. After this set of pages, I've got 2 pages to finish. Whew!

Way Station:   I was just playing around on this page. I had no direction but figured I'd try to put a big flower across a corner. Meh. The quote sums up my feeling on the whole thing, "Happiness is a way station between too little and too much." --Channing Pollack.


Be Mine:  With Valentine's Day coming up, this is my traditional anti-Valentine. This was a clean-up page for my stencils and spray inks in cool colors. It's hideously busy so I stuck with some black as a focal. Not sure whether the "Be Mine" is a request or a demand.

Cheetah:   This page began with the black spots. Those spots are from the small round ink applicator from Tim Holtz. I was using it to apply black Dylusions paint on the page above and cleaned it off on this page. I loved how the circles were incomplete and reminded me of a leopard or cheetah. After going through my stash and coming up with a few cheetah images, I went with it. (I also might add here that I used a combination of spray inks on the background; Lindy's Starburst in Glory of the Seas Gold and Marigold Yellow Orange, a new favorite of mine, as well as Dylusions Pure Sunshine.)

I was organizing my button hoard last week and discovered some safari themed ones and added them in. I put on the whipped spackle and pushed the buttons into it while wet to be sure they held.


The string of running cheetahs along the bottom are cut out from a separate paper and colored with Crayola markers. I carved the cheetah image to make my own rubber stamp. I like how the image can be made to look like the cheetah is running. This turned out to be one of my favorite pages!

Survivor:   I haven't watched Survivor, the reality show, in many years. I used to be a big fan. I laid down the green and blue background then got stuck. Rummaging through the magazine cut-outs, I found the logo and it matched too well not to be used. I knew I still had some "jungle" themed stuff and took off from there. I decided to break the rule of collage that all things need to touch but I decided after I got them all down that I could connect them with the circles. In the end, it reminds me of a board game. 

I decided to add this 3-D interactive element. (After all, Survivor is an interactive game/reality show.) I adore the way it looks but it is a very thick element to add to an art journal. Overall, it was worth it.


I managed to use up a lot of collage scraps with this 2 page spread and I like it.


???:   I've got no catchy title for this page. The quote is it, I suppose. This is the back of the THICK shaker element from the above layout. There was no way I was going to be able to utilize this page as I normally do. It would never lay flat so any ink would just cause a mess, stamps would be useless, and my collage batteries were running low. So my idea was to be abstract. I was going to spray a spot of ink in ROY G BIV and then tear a spot of colored paper to match and....well, okay, so my plan changed when my "spots" of ink just went all over. Still liked how it looked and decided to just fill the page with the Picasso quote. Yo, it's done.

Happiness is a Butterfly:  This is one of my favorite butterfly quotes. I stamped the butterflies first then used a mask to protect them as I stamped the background text. I wasn't sure how much color to add to this so I went with spray inks on the background and left my focal uncolored. (for now anyway. Still not sure I like it that way.) I meant for there to be more turquoise in this background but the yellow ink got away from me. :)

Thanks for taking a peek at the journal. Hope you get a chance to make something soon!
--Wy

Wednesday, January 27, 2016

Chibitronics: Paper Lanterns

Note: This post was originally written last Fall but I didn't post it. Since I'm short on time, I'll post it now. Enjoy!

This is so EASY. I love how these paper lanterns can be hung up ANYWHERE. Seriously, a paper lantern that glows on a battery so you don't have to worry about cords or lines. Hang 'em outside in a tree for a great backyard party!

I have always loved paper lanterns and when they light up, I get all giddy inside! I used the components from the Starter Kit at Chibitronics to make a super simple circuit that you can slide inside the lantern to light it up with battery power! The best part is that the circuit is super simple, it can slide in and out of the lantern, and the top binder clip becomes a hook that you can attach a line to to string it up!


You'll need these items to get started and this makes ONE paper lantern.
Paper lantern (with metal frame)
cardstock
copper tape
5 LED stickers (white)
3V lithium flat battery (1)
binder clip
exacto knife
ruler 
pencil
 

I bought my paper lanterns at Oriental Trading Company. I got blue but they come in a variety of colors and the small ones are about 5" in diameter. These paper lanterns come flat and they have a metal frame that gets inserted down the center to hold it open. This metal frame has a loop extension (used to attach a string to hang it up) and this is the important part. This loop is what is going to hold your circuit inside the lantern.

See that metal loop in there? That's what you need. I'm not sure if all brands or sizes of paper lanterns have this so be sure its there. It makes this project quick and easy. Here's how it works:

1. From the cardstock, cut a piece that's just smaller in width than your metal frame, about 1 inch wide and 1 1/2" longer than the frame. You want a piece of cardstock that will nestle inside the frame but be longer so you can fold over the top to hold the battery. Like this:

These are the front and the back of the cardstock with the circuit already on it.
2. You need to make your fold at the top of the cardstock to hold the battery. Just tuck the battery in there and fold over it. Then, remove the battery and crease the cardstock well.
3. Make a slit in the cardstock with an exacto knife. The slit should be big enough for that metal loop to slide through and it should be positioned just under the flap when closed. (You can see it in the second photo above. It's that hole just to the right of where the copper tape ends.)
4. Make your circuit. Using the copper tape and LED stickers from Chibitronics, assemble your circuit. This is a straight forward circuit, nothing fancy. Just lay the copper tape from the negative side in a straight line and fold over to the back. Do the same with the positive battery line. Just make sure the tape doesn't cross or touch anywhere.
Once you have added the LED stickers, just add the battery and fold over the flap. Add a binder clip to hold it closed and the lights should come on. (If they don't, or one or two are flickering, you just need to make a better connection between the light and the tape. I press them down with a bone folder to make sure the stickers are stuck on. I may need to add another piece of copper tape over the top of the sticker if my gap between the parallel lines of tape is a bit too big.)

5. Now that you have this piece, it's just a matter of assembly. Put the metal frame into the paper lantern. Add your circuit by slipping the cardstock down the center and sliding the metal loop at the top of the lantern through the slit in your cardstock. The binder clip is now your hangar and the lights will stay on as long as the clip is in place.
REMEMBER: if you remove the clip, the battery will fall out as it is not attached to anything!

To disassemble the lantern, just remove the circuit first. Unhook it from the loop and then pull it out of the lantern. Once removed, you can take off the binder clip and remove the battery from it. Then, you can remove the metal frame from the lantern to fold it back down flat. All these pieces can then be stored away and used again!
Wasn't that easy?!
Now you can really get creative! You can decorate the outside of the lanterns for extra pop. You can dangle streamers from the bottom of the lanterns for a bit of movement or to make these small lanterns seem larger. These would liven up any party! Personally, I'm thinking of orange ones with jack o' lantern faces for Halloween!

You can find the light stickers and circuit supplies at Chibitronics to turn your ordinary paper lanterns into something extraordinary.

Have a great week!
-Wy

Tuesday, September 08, 2015

Chibitronics: The Glass Bowl

I'm not quite sure what to call this home decor creation. I REALLY like it. WARNING: This is a lengthy post with directions as to how I made this...or you can just look at the photos by scrolling down.  The basics: Alter/color clear glass bowl; add circuit and battery inside; glue to clear candlestick holder; add glass pebbles inside; tie ribbons around the top lip; done. Here's what I made:


This wasn't too difficult to make so long as you have little hands! :)  The lights and the copper tape are toward the bottom of the bowl on the inside and there's just no good tool to get it in there except your hands. The LED stickers and copper tape are from Chibitronics. Love these stickers. There's no cord to plug in which means this decorative bowl can sit ANYWHERE. And no candle or open flame to worry about.

This piece is actually two separate pieces glued together and decorated. I got both of them at a thrift store and garage sale for about a buck each. The bowl was just clear glass and the "pedestal" is actually a candle holder.
So here's how I started:
1. The Glass Bowl:  I learned a technique for frosting glass and adding crackle texture. I used it on the bowl. I covered the bowl first with Glue-N-Seal from Ranger. (This is like a decoupage medium. I have heard you can do this with other things like ModPodge but I haven't tried it.) I put on a thick coat but not so thick that it would run or clump while it dried. It's pretty thick stuff and clings very well. Once that coat was dry, (I let it dry overnight.) I added Distress Crackle Paste (Rock Candy) which is a clear crackle medium. To get good "cracks", apply a coat like you did with the Glue-N-Seal. This stuff is a bit thinner and will tend to pool so check on the bowl periodically to turn it over. I let it sit on it's bottom then shifted it to sit on the top and kept flipping it as it dried. When it dries clear, you'll see the crackled pattern and notice that the glass doesn't look as "frosted" as it did after you applied the glue. 
NOTE: You may notice at the lip of the bowl the glue seemed to start to peel away. That's due to the crackling medium. It is still attached but if you scape at it, I'm sure it will come off. So this is a "handle with care" piece! (I wasn't too concerned as I planned to cover it up anyway.)

2. Add Color:  After the bowl was completely dry, I added alcohol inks to color it. (I used Adirondack alcohol inks from Ranger.) I went with a few blues to give it an ombre look. You need to add the ink to the outside because it won't stick to the glass on the inside. It only sticks to the mediums that you've applied.
3. Add circuit:  To make the bowl light up, you need to add a battery, copper tape, and LED stickers to make a circuit. (All can be found as part of the Starter Kit from Chibitronics.)

The photo above shows the completed circuit inside the bowl. I created a battery "pack" from a folded piece of cardstock. I glued a strong magnet to the underside so it will hold the battery in just the right spot. I just added the tape from that to the sides of the bowl. I added my white light stickers and then the battery to test it out. When the flap is down, the lights come on!

4. Attach bowl to candle stick holder.  As I stated, the pedestal is just a clear glass candle stick holder. After I was sure the circuit worked, I attached the bowl to the top of the candle holder with E6000 glue. I applied it generously and let it cure overnight. I had to keep the bowl stable on it's open top and add some weight on the whole thing to be sure of a good bond. (I just used an acrylic stamping block to balance a bag of glass pebbles on it. So the bowl was upside down with the glue holding the candle holder, then I put a large acrylic block on the bottom of the candle stick. Then, I balanced a baggie of glass pebbles on the block for weight.)
5. Add some weight.  In order to hide the battery pack and to keep it lit, the bowl should be filled with some glass pebbles. You can find the clear ones in just about any dollar store or in a craft store with the fake flowers. I got mine in a thrift store for under a buck.

You may want to add the pebbles all together in a bag so it's easier to get them out to add/change the battery. So long as the pebbles are in there holding down the top of the battery pack, the lights will be on. It also helps to protect the LED stickers from getting dislodged or broken. The pebbles can be any color but the clear ones reflect the lights very well!

6. Add some ribbon.  As a finishing touch, I glued down several different ribbons around the top edge of the bowl. I made one long enough to tie into a bow.

When lit, you can see the light reflect off the pebbles and the color of the ink. You can see some of the copper tape and the back of the lights as small yellow dots. I love how it looks all lit up in the evening.


So check out your local thrift store for some clear glass to alter and color. You can match your own home decor and then make it light up!

Have a great week!
-Wy

Friday, August 07, 2015

Chibitronics: Inspiration Art Journal Page

I got to sit down this past weekend and get my latest Inspiration Wednesday Journal page completed. I didn't go exactly the way Donna Downey did in her journal but then, I don't need a bunch of texture in my pages...I prefer color. As I worked on the assignment, I had my Chibitronics kit in arm's reach as I was working on some other projects with it. I just went ahead and used it. I mean, why not? So my art journal page lights up with battery power!

Red Heart Page:  It's so easy to incorporate the Chibitronics LEDs into the journal because you can set it up just like the starter kit journal! The folded corner is where the battery is and you can see my red LEDs lit up in the corners of the patterned paper. I used the heart that I cut out from the middle on the facing page spread. The background is Dylusions inks, stenciling, rubber stamping, and some splatters.

Overall, I kinda like the page. I LOVE the lights...they work great! The background probably could have used a few more layers or perhaps, the addition of another color. This is the first project I've done with the Chibitronic LEDs where I haven't hidden the "circuit". I like the look of the copper tape as an embellishment, and I have a plan for a future card done in this manner.

Here's a photo that shows off the lights a bit more:

If you're interested in trying out these LEDs in your craft projects, you can find them at Chibitronics along with some ideas on other ways to use them.

I hope you found a little inspiration for your art journal! Have a great week!
-Wy
"Lightness has a call that's hard to hear."  --The Indigo Girls, "Closer to Fine"


Tuesday, June 16, 2015

The Firefly Card

Seems like forever since I had a project to share! Every day I've had available to craft, I've felt...not-so-good. But finally on Sunday, I got something done! And bonus!...it lights up! I'm linking this project up to the Lawnscaping Challenge, too!)

Chibitronics makes it possible. I am having a fun time with my Starter Kit and a few extras. Check out their site for great ideas and see what's possible. I highly recommend the Starter Kit! It has all you need to get started and to make this card. (Except the strong magnet. Those magnets can be found HERE.)
I highly recommend reading the Sketchbook from the Starter Pack for more detailed info about how circuits work and can be designed. It's far too much to include here. But the directions in the Sketchbook are easy to understand and take you step by step through making your own circuits.

Here's my finished project:

I used Lawn Fawn stamps from the Critters in the Burbs set and from Summertime Charm set.
Light up cards aren't hard to make so long as you plan it out first. The stamped portion of my card is a separate panel that I attached to the card base so I could hide the circuitry.
In a nutshell, you need only a few things to make a light-up card: a power source (battery), a conductor (copper tape), lights (LED stickers). In essence, you connect the positive from the battery to the positive on the light via copper tape. Same with the negative. Don't cross them...you'll get a short circuit. That's the basics.

Here's the process:
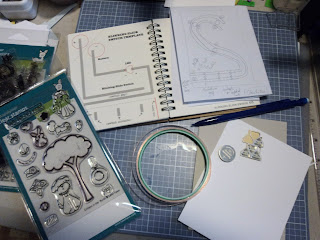
1. I gathered up my materials. I basically pulled out my Chibitronic Starter Kit, some stamps, a card base and extra panel, a pencil, and adhesive. My idea was to stamp a night scene with fireflies that would light up. I sketched out a little scene on scrap paper so I had an idea of how the finished card would look.

2. Sketch out a "skeleton". I call the internal circuitry, the skeleton, of the card. I didn't want all my copper tape to show and I wanted the small LED lights to shine through the paper/cardstock. The photo above shows my first attempt at sketching out the skeleton. It wasn't going to work. The left side shows a page from the Sketchbook that comes in the Starter Kit...it was what I wanted. A Blinking Slide Switch. So when you run your finger along the bottom of the card; the LED sticker lights would blink on then off then on...
(The card doesn't end up this way because I goofed it up. I'll explain some at the end of this tutorial.) The above sketch wasn't going to work so I tried another sketch as seen below.


3. Plan out your lights.  I stamped out where I wanted the fireflies to be (those round circles) and penciled in lines to connect them. I need a continuous line for the negative. I need two lines for the positive because that is where I'll place my switches. The negative line will run from the battery through the lights then end on the front. One positive line will connect all the lights and then form a line along the bottom of the card. The other positive line will run along the bottom of the card and connect to the battery. (The actual switches will be added later. They go on the back of the front panel.) The lines are going to be my guide for laying down the copper tape. They trail off the edge of the card front because the battery is going on the inside of the card. So the tape has to wrap around to the other side.


4. Lay down the copper tape. Following the lines of the skeleton, I laid down the copper tape. (Refer to your Sketchbook for tips and tricks on how to lay it down.) I just followed the lines making sure to keep it continuous. I used the outline of the LED stickers to approximate how much space to leave between the positive and the negative lines. The LEDs need both lines to touch so make sure not to leave too much of a gap. You also don't want the positive tape to touch the negative tape or you'll have a short circuit.
 

5. Connect the tape to the battery. The copper tape has to wrap around the edge of the card in order to connect to the battery. Just wrap it around to the inside of the card and end them. I like to trace around the battery so I know where it's going to be placed. The battery is placed along the fold of this card so the tape hits both the positive and the negative when the card is shut. THAT will power the lights.
6. Test the circuit. I always test the circuit when I've got it done. So I add the LED stickers to my preselected locations making sure the positive end is touching the positive tape and the same with the negative. Once my LEDs are secure, I add the battery to the inside of the card and close it. Because I have a SWITCH in my design, the lights will only get power when the gap is bridged by copper tape. So to test, I laid a small piece of tape along the gap where I can press.
 
I placed the blank panel over the top of the card and pressed. The LEDs lit up! Circuit is good to go.
With the skeleton complete, I can now work on the front panel of my card.

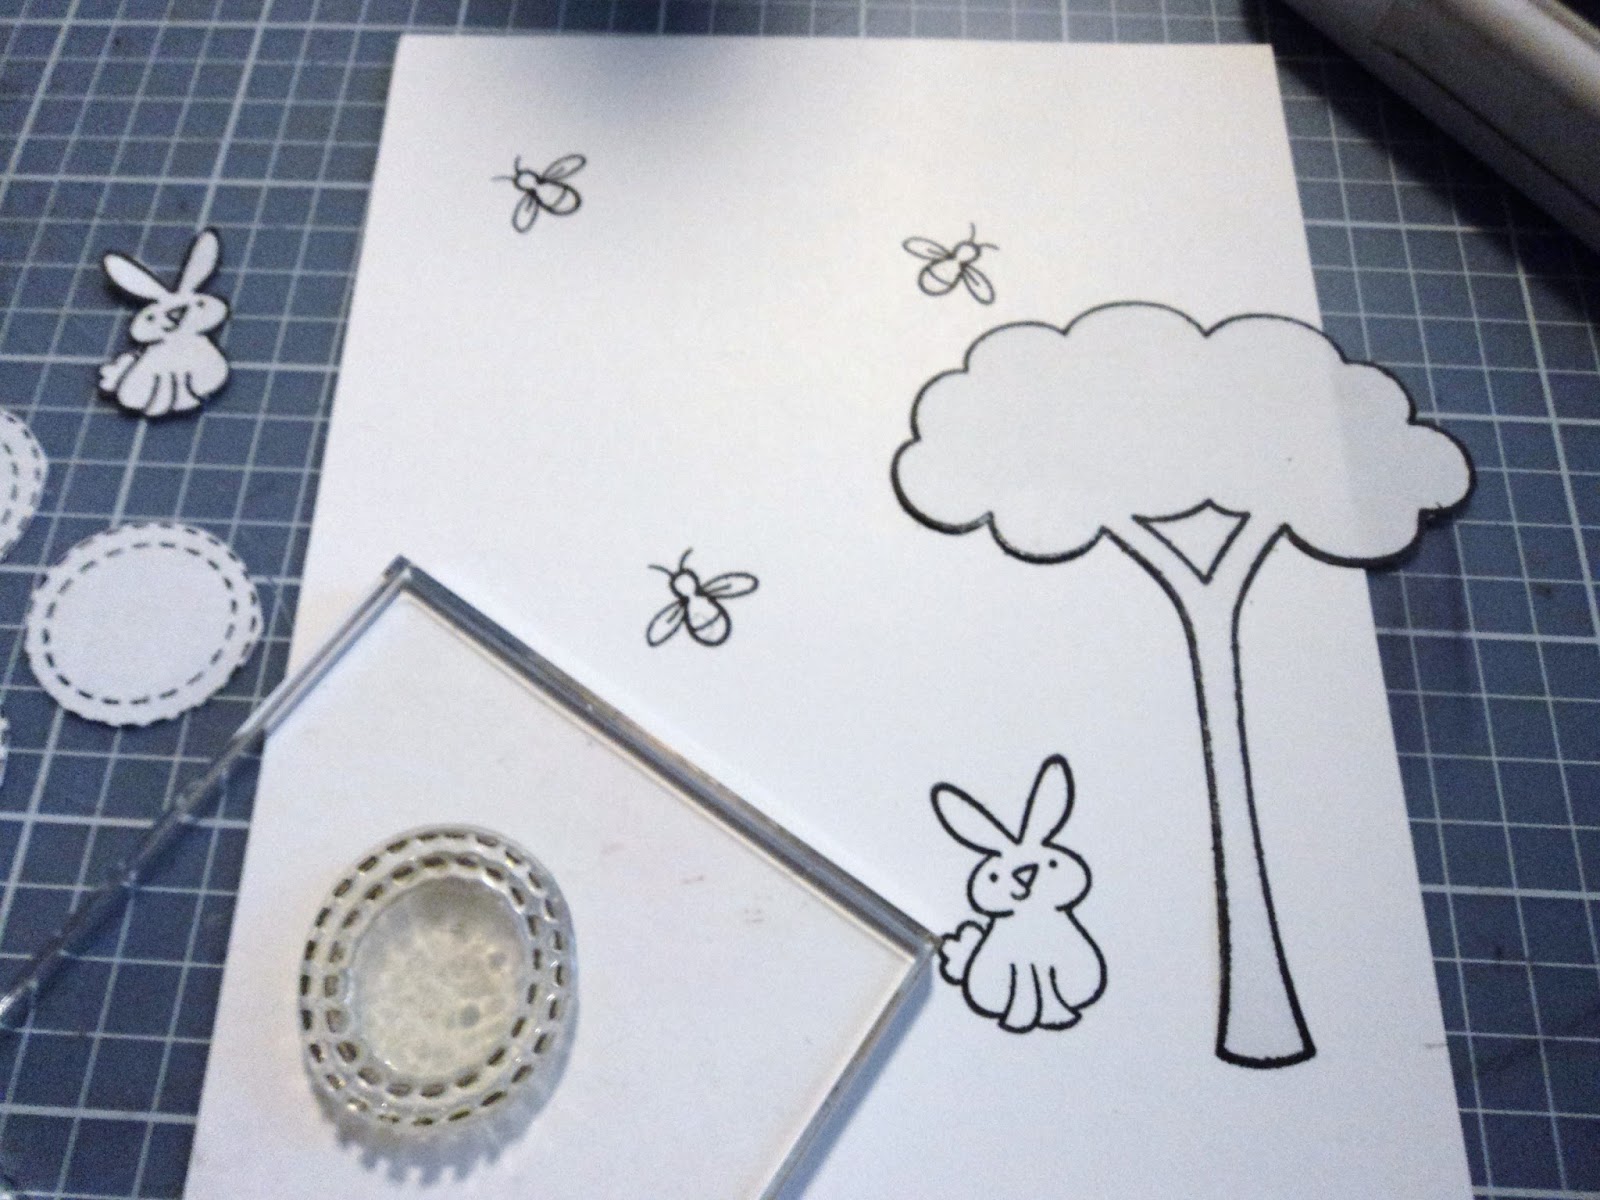
 7. Position the fireflies. While the test lights were on, I made a little circle with my pencil as to where they showed up on the front panel. That's where I want to stamp my fireflies so that they are aligned with the LEDs underneath the panel. Once I had those stamped, I just positioned the rest of the stamps around them. I cut masks for all the stamps; the tree, the bunny, and the circles. I was going to ink the background and I wanted these places to remain white so I could color them in. 

8. Ink background. With the masks in place, I began to ink the background to make my night sky. I started with Distress Broken China, then added Midnight Muse (Stampin Up!) (Distress Chipped Sapphire would also work here!), and finally blended a little Distress Black Soot just along the upper edges. I used a sponge to apply all the inks directly to the front panel.


9. Remove masks and color. Once my background was the way I liked, I pulled off all the masks being careful not to get my inky fingers onto the white areas. Then I colored in the images with Distress markers. I added a strip of green patterned paper to the bottom to give a horizon line and to house my sentiment.

 10. Attach panel to card. It was time to add the switches. Switches are just little pieces of copper tape added to the back of the FRONT PANEL. So when the front panel is attached to the front of the card, the tape can be pressed into the gap to complete the circuit. Once my scene was complete, I added double stick tape along the edges of the back of the front panel and lined it up with the card front. Once I added my battery to the inside, and pressed along the sentiment, the fireflies all lit up!


So here's my Ooopsy: remember when I set up my circuit it was supposed to make the fireflies blink? Well, that didn't happen. I believe I placed the switches too close so that when I pressed the first, it also connected the second so the fireflies never blinked off as I ran my finger along the edge of the card. But hey, it's a learning process and I like the card as it is. They light up fine!


 11. Attaching the battery. The battery just has to make contact with the copper tape. When the card is shut, just holding that corner will make that connection. I added the small magnet to the back of the card to hold the battery in it's proper spot. That magnet holds the battery to the inside of the card so that it doesn't fall out. I then taped the magnet to the back of the card so it wouldn't shift in an envelope.
Lastly, I just added a few stars to the sky with a white gel pen.


Whew! Finished!
This card is a real show stopper. Although I goofed up my blinking switch, I still love the card and it lights up so wonderfully. Photos can't do it justice. These little LED lights add a Wowza to an otherwise simple little card.

If you want to recreate this card, you can find all the things you need for any light-up project at Chibitronics. The Starter Kit is well worth it and you get enough supplies for several projects!

I'm planning out my next light up adventure already...perhaps a paper lantern or maybe a banner? Hmmm...
Thanks for dropping in.
--Wy
Lawnscaping Challenge #108: Stars and Stripes


Featured Post

The Chocolate Game

 Let's talk about something sweeter than my other blog posts of late. Let's talk chocolate. But no guarantees that anything I want t...