Showing posts with label RCS Challenge. Show all posts

Sunday, April 26, 2015

Red Carpet Studio Challenge #100: The Iron Giant

I am TOTALLY, SUPER EXCITED FOR THIS AWESOME CHALLENGE!!!!

Check it out...100th challenge!!! Go to Red Carpet Studios to find out all the details of entering our challenges! You could win a great prize from one of my favorite companies: LAWN FAWN. This month's sponsor inspired my choice of movie for this challenge as they have a wonderful little stamp set of ROBOTS!
See:

So here's our movie: THE IRON GIANT

Your Challenge is to use this movie poster as your inspiration. Now that's not hard! Look at all the marvelous things in it that can be utilized for any kind of papercraft. It has a lovely sunset, a massive robot, a giant moon, searchlights and clouds, a metallic pinged logo, bright colors on a dark background, dark silhouette shapes...there's loads there...keep looking!

So here's a few projects that I did for my challenge:


Little Robots:  I imagine the translations says, "happy birthday". Using Lawn Fawn's robot stamps (You could win this!), I paper pieced the two robots using their Hippo gray papers from the Let's Polka 6 X 6 pad. (You could win this,too!) I stamped the square balloons to add some color and the beep and boop. The graph border is from a different set from Freshly Squeezed (now defunct).

I can't help but smile at these cute little stamps.
So here's some more:


On these two cards, I colored in the robots with markers rather than paper piecing them. The background papers are also from Lawn Fawn, the Let's Polka collection. (Hippo dots and stripes)


This one is almost done...I just have some gears to add...but imagine that!...I ran out of them! So this little guy is just waiting for some Idea-ology gears to perk up a corner or two.


Here's another "Robot":

Mister Fancypants:  This card uses a set from Stampers Anonymous called Dandy Robot. (Art by Brett Weldele) It's a straight-forward stamped card. I added some idea-ology gears in the corner and the background is a random assortment of numbers repeatedly stamped to form a background pattern. I used various browns from the Distress Ink line and heat embossed the words with copper embossing powder.

I also inked the edges of the card and decided against coloring it in.

What do you think? Is it the year of the Robots?
If you want to see another one, go HERE. It'll be worth it! (Hint: it uses another robot from that Stamper's Anonymous link above!)

Thanks for playing along with Red Carpet Studio this month. We're off on a hiatus for a bit after this month so enjoy the month of May! Come back to my blog once in a while as I'll be posting projects as usual. Thanks for checking me out!
--Wy
"We are not in danger of becoming slaves anymore but of becoming robots."  --Erich Fromm


Sunday, April 12, 2015

Red Carpet Challenge #98: Overboard!

This week's new challenge at Red Carpet Studios is the movie: Overboard!


This week's challenge is to use both a masculine and feminine element in your project!
This month's sponsor is LAWN FAWN!

 You could win a 6 X 6 paper pad and a stamp set of your choice! I love LAWN FAWN stamps and I just bought some of the Mon Ami papers...delicious! But back to our challenge...

I wasn't sure about how to incorporate both masculine and feminine elements so I tried my hand first at a card.


Keys to the Past Card:  I had some scraps lying on my table (wow, really?). I paired up the masculine fabric stickers of cars with the feminine elements of ribbons and a bow. It works but I thought maybe I could do better. (The overall feel of this card still seems very masculine to me.)

My first thought was a Steampunk style but I have a real problem pulling it off the way I'd like it to look. So I thought about what masculine elements I could pull from that style. Naturally, I went with gears. (Have I mentioned that I love circular objects?) I could maybe pair it with more ribbon or lace...or maybe some flowers.

So I began playing in my art journal and this is what I finished.


I had a rough time deciding if this page was finished or not but it is. I used Dylusions spray ink for the background color then used Glimmer Mist Copper to stencil in the gears over the top. I LOVE this combo! Added some stamps for texture then went on a paper ripping binge to create my flowers for the bottom.


The die-cut gears were given to me by my sister to try out. LOVE. They were cut out of a bright yellow cardstock so I painted two smaller ones white and embossed the two larger ones with super fine copper embossing powder (Ranger). I added a bit of Distress ink (walnut stain, black soot) to grunge them up a bit.

My favorite spread in the new Dylusions journal (Inspiration journal) so far. Also learned that I may need to make most of my backgrounds BEFORE completing pages as the ink bleeds pretty badly into the center and soaks through to other pages in the same signature. Nothing too disturbing to me so far; I'm rolling with it for now.


Remember to share what you make with us over at Red Carpet Studios! I love to see what you create! Our Design Team loves to comment on your work, too!
--Wy
"Ya can't live with 'em, ya can't live without 'em. There's something irresista-bull-ish about 'em." 
               --Kermit the Frog, The Muppet Movie

Sunday, March 22, 2015

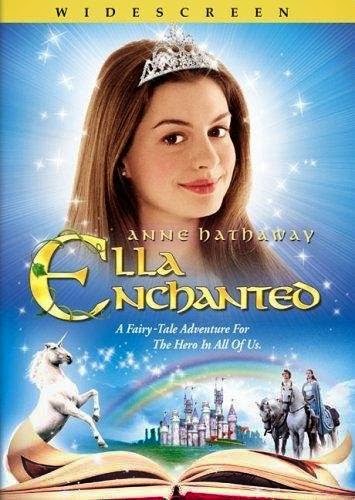
Red Carpet Studio Challenge #96: Ella Enchanted

This week's challenge for Red Carpet Studio is based on the movie: Ella Enchanted!


The theme is to make a project that inspires a fairy tale. Make it magical!

Our sponsor for the month of March is:


A random participant will win a $15 gift certificate to their on-line store! Check them out HERE!


For this challenge I wanted to do something different from a card. The theme is one that gets me excited so I decided to do a project I had been putting off for too long; an altered box!

I've had several old cigar boxes hanging around just waiting for me to work on them. But I just never got to them and when I put them away in my closet...well, you know the story...once its put away; out of sight, out of mind!


I didn't take photos of it along the way but here's plenty of the completed box:


Secret Fairy Box:
The front side is repeated on all four sides. It's scrapbook paper (Once Upon a Time from DCWV) with green heavy body acrylic stenciled over it. (Stencil from Joggles: Branches)
Not too impressive...but here's the top and that's the part you'll always see:


 All of this stuff was in my stash with the packaging long gone. It's lace and pearls, buttons and rhinestones. I did alter the glittery flowers. They were originally white and I sprayed them with some Lindy's Stamp Gang spray.  It's a permanent spray ink. I also transformed the metal butterflies from gold to silver with the help of some silver metallic Adirondack Alcohol ink (Ranger). Great stuff.
 

All of the embellishments are glued down with Ranger Multi-medium. And they are on there GOOD!


Yup, even did the inside. More green paint and some scrapbook paper.


The inside of the lid seems finished...not sure. I like it but it does seem a bit empty. Anyway, more scrapbook paper and the lace trim wrapped around from the front. I just added a bit of leftover bling. The ribbon at the top that is the "handle" was the first thing I did so I could layer everything else over it to hide it. It's also colored with the Lindy's spray that I used on the flowers. (The spray soaked in better to the ribbon and saturated it better than the flowers, hence the ribbon came out much darker than the flowers!)

Overall, it came out very well! I did prime the box with Gesso then added a layer of paint...pink, of course. Just so I didn't have to worry about covering every centimeter with paper; the paint would provide coverage.

This project took me about a week to complete and most of that was drying time. Every time I stenciled, I had to wait for it to dry completely before moving on. I let it dry overnight to be sure I wouldn't smear it all over the box.

I love getting a project like this all completed...a project I had been thinking about for awhile but never felt motivated enough to start it. Yippee!

So be sure to share your paper craft project over at Red Carpet Studios! I'd love to see what you create!
--Wy
"Once upon a time..."


Sunday, March 08, 2015

Red Carpet Studio Challenge #94: 50 Shades of Grey

This week's challenge at Red Carpet Studio was a touch difficult for me. Grey is not a color I use in quantity. Grey...Gray...it's a shadow; a shade; a subtlety often overlooked. It's gloomy.

But this challenge is to make a project using only grey and a touch of red. I think it makes sense to those of you who have read the book and will soon see the movie. (Obviously I haven't. I have only heard about it...)

If you want to step out of your comfort zone and join the challenge, you may be randomly selected to win a prize from this sponsor:
 
 Check out our sponsor HERE. 

Here's what I made:


Thorny Heart:  I made a "box" card out of grey cardstock. I used a small rose stamp and embossed it onto another shade of grey cardstock. I embossed some in black sparkle and some in silver (in my book, silver is a shade of grey). On some of the roses, I colored them in with Pumice Stone, a grey Distress Marker. (My prediction for a new Distress Color this year is another shade of grey!) I drew in the thorny vines then adhered my cut-out roses over them; 4 per panel.


After working on this a while, I thought it needed something extra. That's when I decided to cut the top panels to look like more vines. I thought it made a nice effect; sort of like a cage and sort of like a peek into what lay in the middle.


I cut out some "vines" from black cardstock then a heart from white glossy cardstock. I colored the heart with Barn Door Distress Stain and added a line of glitter pen around the perimeter. I covered the whole thing with glossy accents to be sure it "popped". 


The above photo is how the card looks folded down flat. 

For being very hesitant to work with all grey, I like the project. I'm gonna keep this "anti" Valentine for someone special! 
Don't forget to link up your paper project over at the blog! I'd love to see what you create!
--Wy
"Every rose has its thorn. Just like every night has its dawn. Just like every cowboy sings a sad, sad, song."
                 --Poison, "Every Rose Has its Thorn"

Sunday, March 01, 2015

Red Carpet Studios Challenge #93: Public Enemies

Time for new month of Challenges over at Red Carpet Studios! Be sure to visit our challenge blog and link up your paper project to be entered to win a fabulous prize.

This week's movie is: Public Enemies.
 

 The Challenge:  Use a Distress Technique in your project.

Our Sponsor for the month of March is:

You could win a $15 gift certificate! www.myscrapsandmore.com

Okay so here's my card:


 Vintage Besties:  I wasn't sure what kind of greeting would be appropriate for this card so I just left it blank, inside and out. I really like a vintage look and I have so much paper that relays it that I just started there. This is just a lot of scraps with an impressive embellishment. (If I do say so myself!)


I made this little cameo embellishment. My mom bought me a little stamp set at JoAnn's from the clearance bin. It had an oval and two female silhouettes. I stamped them in black Archival Ink (Ranger) and then colored the back ground with Distress marker (Dried Marigold, also Ranger). It looked good but it needed more. I added a ring of Distress marker, Rusty Hinge around the outside then added on my pearls. I cut it out and added Glossy Accents (Ranger) to cover the middle. (So it looks like an epoxy covering.) I love the way it turned out!


 I may have cheated just a little on the challenge. The only "distress technique" I used was to ink the edges of the card and the "photo" with Walnut stain Distress ink.

But this card is a definate stepping stone for me. I can play with the papers and add more embellishment and make several versions of this card in a jiffy!

Hope you enjoyed! Be sure to visit Red Carpet Studios to see more great projects!
-Wy
"Boy the way Glenn Miller played
Songs that made the hit parade
Guys like us we had it made
Those were the days."     ---"Those were the Days", Theme from "All in the Family"

Sunday, February 22, 2015

Red Carpet Studio Challenge #92: The Academy Awards

This week over at Red Carpet Studios we're celebrating the biggest night of the Movie year; Academy Awards night! Have you seen any of the nominated movies? Who do you think is going to win?
I made my picks right HERE. I don't know if I'll get any right as I haven't seen too many of these movies. (I gotta get out more!)

Our challenge this week is to create a project to celebrate the Oscars! So use circles, gold and either a bow or bling in your project! Please go to the Red Carpet Studio Challenge Blog for more details about how to enter YOUR project into our challenge and maybe you'll win something special!

Our sponsor for this month is:


Here's the card I made:

Black and Gold Congrats:   A simple but elegant card, I think. I cut circles with my circle cutter, added a few Dazzles from paperwishes.com, and a smattering of pearls for my bling. I embossed the word with white embossing powder and called it a day.
 

It's my attempt at a clean and simple type card. I have a hard time doing them usually but this one came together in a flash. Great way to use up scraps and leftover bling!

Give it a try. Share your project over at the Challenge blog. I'd love to see what you create!
--Wy
"[Awards are very nice] but if you're not enough without them, you'll never be enough with them."
--The Coach, John Candy in Cool Runnings


Sunday, February 08, 2015

Red Carpet Studios Challenge #90: Casablanca


This weeks challenge at Red Carpet Studios Challenge Blog is the based on the classic movie, "Casablanca".
Follow the link to go to the Blog to see all the details and link up your papercraft project! (You've got a whole month to work on a project! Hint, hint!)


If you link up a project at the challenge blog, you may be randomly selected to win a great prize from our sponsor!


The Challenge itself is to use black, white and one other color of your choice on your project.
So here's lookin' at you, kid:


We'll Always Have Paris:   I was inspired by the line in the movie, "We'll always have Paris." It's tragically romantic and what's more appropriate for Valentine's Day than that? (I'm not much into Valentine's but I do have a romantic side.) This card is from Paperwishes.com and was already die-cut. I used templates to cut my patterned papers to fit each section. I added some embellishment on the inside and used the Distress Ink color, Picked Raspberry for my pop of color.


Basically this card is all scrap material or stuff from my stash. I'm desperately trying to downsize and I hope to continue my 2 year run of "I will not buy any more paper". (Imagine that! I have only bought paper 4 times in the last 2 years and each time it was only a single paper pack of 20 sheets or less!) I know I will be indulging in some new paper this year just to have some new product to play with but I will once again, be very selective in my purchases.


The heart in the middle of the card looks like the photo above when the card is closed. When you open the card, the pink heart is revealed. The pink heart is cut from a glossy cardstock and I used an ultra-fine black Sharpie to Zentangle on it. Then, I went over it with Picked Raspberry Distress Stain. The distress stain  works well on glossy cardstock and the sharpie doesn't smudge under it.

I hope you'll join us over at Red Carpet Studio Challenge Blog for this weeks challenge! I'd love to get some more ideas from all of you about how to use up my black and white paper! Thanks for dropping by!
--Wy
"If you don't get on that plane, you'll regret it. Maybe not today, maybe not tomorrow, but someday. And for the rest of your life."  --Rick (Humphrey Bogart) in Casablanca

Sunday, January 25, 2015

Red Carpet Studio Challenge #88: The Book of Life

This week's challenge was too good for me to pass up! Over at Red Carpet Studios Challenge Blog you can find all the details to get your paper project linked up for a chance to win a great prize from our sponsor.

This weeks movie is "The Book of Life" and the challenge is to make a project that is inspired by the movie poster.
 

Our sponsor for this month is:


 How can you not be inspired by sugar skulls? Right? Right????
Well, anyway...that's the way I went...Day of the Dead: Sugar Skulls just cuz I love 'em!
Here's my tag:

Sugar Skulls Tag:   This is a #5 tag (much smaller than the ones Tim Holtz uses) that I used as a mop-up tag for inks. I added touches of Distress Stain (Ripe Persimmon) to enhance the orange color. I'd hazard a guess and say that the purple colors are a combination of Dylusions, Lindy's and Distress Seedless Preserves. There is some sparkle that doesn't show in the photo.


My skulls are plastic embellishments that I got in a huge bag last year at Halloween. (a gift from my Mom) They were skull and crossbones but I just cut off the bones with a pair of sturdy shears. I decorated the skulls with Sharpie markers in various bright colors. (I think most of them were from some '80's set) I added the strips and words at the bottom and the ribbons at the top to finish it off.


Leave me any comments and be sure to share your paper crafting project over at Red Carpet Studios so I can see what you create!

Have a great week!
--Wy
"Why would you want to go up there when everyone is dying to get down here?"  --Elder Gutknecht, "The Corpse Bride"


Featured Post

The Chocolate Game

 Let's talk about something sweeter than my other blog posts of late. Let's talk chocolate. But no guarantees that anything I want t...