Showing posts with label scraps. Show all posts

Friday, April 16, 2021

The Scrap Stash Project: The Motherboard

 I've been using up my Scrap Stash recently and I'm rather surprised at how well and efficiently I've managed to whittle down the pile of parts and pieces. From a file folder stuffed with patterned papers, I've used up my larger scraps. But what to do with the smaller or odd-shaped bits?

Here's where it gets interesting. I am not the originator of this method. I read about this in a magazine article years ago and it was called The Motherboard. If you want to use up a lot of scrap bits all at one go, this is the method I highly recommend. And I've recently discovered a way to jazz it up a bit. But first, the original method.

A Motherboard is just a collage of paper. I used to make them in large sizes (like 8.5 X 11) and cut them down to card fronts. But I've changed my method as it's easier for me to work in the card front size from the beginning and I don't have to worry about cutting through multiple layers of paper with my trimmer. 

So here's how its done: cut a piece of paper/cardstock to A2 size. This is your base. Add a selection of paper pieces to the base with adhesive. I have found that I have lots of long rectangles and square shapes in my scrap pile. I like to make stripe backgrounds with these. Just cover the whole base and voila, a background ready to attach to a card base.


Wanna know how to make this even easier? Use sticker paper or an adhesive sheet as your base. You know those sheets of label paper that you can run though a printer? THOSE are awesome. Just cut them up to base size (or just use the whole sheet and then cut it down), remove the backing to expose the "sticky" side, and add your scraps to it. I like to just hang the scrap paper over the edge of the base and trim it off with scissors. That way, I don't have to get frustrated trying to line up an edge. It's all scraps anyway!


Wanna jazz this up? Make it look a little more cohesive? When you use the sticker paper, leave gaps between your pieces where the adhesive is still exposed. In those gaps, you can make a little magic.  


One thing you can do is add embossing powder to the sticky gaps between your papers. Once heated and melted, you get a glossy layer in your background. Just a reminder that embossing powders come in many forms and not all are great at sticking to the back of a sticker. But if you like this textured look as shown in the photos, it's pretty easy to do. If you prefer a smoother look, you'd have to use a very fine embossing powder or apply layers of embossing powder. That is not so easy as you'd have to apply an embossing ink over only certain areas. I like the textured look. (Though, I didn't try it, you could also apply very fine glitter in this space and burnish it in. Not sure if it would stay attached and I'm not a glitter girl.)

Or you can make it even easier (but no less messy) by adding foil to the sticky parts. I tried this a couple ways and here's what I discovered.

If you want to use those foiling sheets, like Deco Foil, that run through a laminator, it might work. I tried that. However, I discovered that because some of my scraps were more heavy-weight papers, the thickness prevented those foils from adhering everywhere. I couldn't get the foil in contact with the adhesive on the paper without having gaps. Those gaps, of course, would then stay sticky. If you had larger open areas, those types of products will work. For my applications, they didn't. As you can see from the photos, I wanted the foiling to simply fill in the gaps. (I will also mention here, that I did not try running it through a die cutting machine. It may be enough pressure to make the foil adhere without heat. In this method, I am not using a laminator to apply the foil: I'm relying on the adhesive, which is not heat stable.)


To fill in the small areas, I used a product called Mega Flake. (Cosmic Shimmer makes a product called Gilding Flakes. Same thing.) There are several products like this on the market and it's not anything new. It used to be called "gold leafing". This product is a jar of very thin, metal flakes. Imagine a very thin piece of aluminum foil chopped up like a salad except you have a mixture of metals like gold, copper, and silver. These flakes can then be applied to a sticky surface (some have a special glue that remains tacky when dry) and burnished into the surface. This type of product works sooooo goooood for this application.


So I used a sticker label sheet cut down to the size of a card front. Exposed the adhesive. Laid down all my paper scraps and applied the flakes to what was left sticky. These flakes are very light and full of static so be prepared for a mess as bad as a 4 year old with glitter in a sprinkle jar. But the results are worth it. I would recommend working on a bare, hard surface that is easy to wipe off because the little bits of flake will become glitter and get everywhere. (I personally worked on my floor. My floor is covered with vinyl tiling and it was a simple matter of sweeping up when I was finished.) Be sure to follow the directions that the product provides. It requires a little burnishing and some buffing. Mega flake and the Gilding Flakes come in mixtures of colors and these flakes provide a more mottled look as seen in this last photo. Heads up: Flakes of this nature are also less shiny than the foil sheets. Just a FYI.
Also, you can use the two products together. Just use the foil sheet first, then add the flakes to fill in any gaps the sheet leaves behind. This will also give you a bit of a mottled interesting look.

I didn't count how many backgrounds I got from my scrap pile but I had a large stack on my desk when I was done. I'm still working through finishing some of them but next post I'll try to remember to share how I finished these.

-Wy
PS: Here's what those "flakes" look like.


Sunday, March 21, 2021

A Few Art Journal Pages

 Just sharing a little playtime fun. I just was having a hard time with another project and needed an escape from what wasn't working.

Enjoy the photos!


As you can see, I was trying to use up scraps that have been sitting around on my table for far too long. I'm also working on a post that shows what I've done with a lot of my card-making paper scraps. Coming soon.

Happy Spring!

-Wy

Monday, May 25, 2020

The New Normal: My Sister's Challenge Envelope

A couple weeks ago, my sister delivered to me a Challenge envelope. We like to make cards together and it's fun to throw ideas around at the table. But since Covid-19, we haven't been able to get together. This envelope contained all sorts of scraps, stickers, and bits that were left over on her craft table one day. She gave it to me to see if I could make some cards with it all. I finally finished the challenge.

I made 5 cards with everything in the envelope. I provided the card bases and a few little embellishments like foil or glitter glue. I also added sentiments or greetings on them. I'm going to add some details here about how I approach using up scraps to get a finished product and hope that maybe you'll find it helpful for using up the leftovers on your craft desk.

The very first thing I do with random bits and bobs is to sort them out by color family. This really allows me to see if I have enough of one color to make a card or if I'll need to draw in another color to have enough for a card front. Patterned papers are great for bridging color families and adding some visual texture to a card front. Scraps are small enough that you don't have to fuss too much with the pattern being too busy.

Let's look at the first card I made from the envelope.

Bottom's Up!  The blue scraps in the envelope were various tones and the largest piece was blue vellum. I'll note here that I hate vellum and I never use it so I wanted to use it up in one big chunk. I figured the best way to do that was as a background. The scrap of water paper paired with the frog part allowed me to make a focal element that matched the vellum. The top part of the card was simply done to cover up the tape behind the vellum. I provided most of that scrap from the pile on my desk in order to tie in the two small leaf stickers I had in the envelope.

By sorting the scraps out by color first, I could easily see how much I had to work with and where I would need more and where I would have plenty. 

So then,

Nobody Sweeter  I still had some blue stuff left but since I wasn't sure how to put them together, I moved on to the pink pile. The pink family had these great patterned papers and a stamped image that was already colored in. I played around with the placement and finally decided to make the floral into a cake topper. The paper scraps were used up on a single card and I used some light bluish line stickers to define the tiers of the cake. The foam dot on the little butterfly was falling off anyway so I just removed it and glued it down flat. This one came together quickly because I could make the focal image from the scraps themselves.

After this, I decided to see what I could make from what I considered the gold family.


The gold family had only a couple stickers in it and I tried to pair the gold family with the green family. But somehow the shades of the patterned paper in the green family weren't quite vibrant enough for this brightly colored butterfly sticker. I had been provided with this green vine still on the Xyron sticker paper. When I pulled off the top part to expose the sticker, I noticed that a lot of the adhesive was stuck in the leaf portions. So I decided to foil it and see what happened. Then the copper colored foil would bridge the gap between the green and the gold families. 

Since the fence piece was white, it would match anything and I put my greeting beneath it as it looked weird just hanging there. I pulled in some paper from the blue family as I decided that the butterfly looked best on the turquoise cardstock. The blue family also had the largest scraps of paper left. 

So after I sort the scraps by color, I then look at their size. Will it fit the length or width of a card front? How big is it in relation to the other scraps I've got? 
So sort by color first, then by size.
Then this happened,

This stamped image of a seed packet was in the envelope, already colored in purple and pink.  Remember what I said about size? This element was the biggest thing I had left but I already used all my pink stuff for the "nobody sweeter" card. I was going to pair it with the blue family but I didn't have a lot left. The green patterned paper was double sided. It had a rusty orange color on the back (which might have worked well with the butterfly sticker) but I really liked this plaid pattern better. It seemed to match some of the deeper green tones in the leaves so I framed out the stamped image with it and added the word that was also in the envelope. The Hope word matched the green plaid and also covered up the gap between the thin scraps along the edge. 

Then I was left with the leftovers from the leftovers. Now all I had was one or two things from different color families. These truly were scraps as I now had nothing to use as a focal image that had come in the envelope. So I pulled in a focal of my own to make it work.


What I had left was the patterned paper from the blue family and the metallic gingko leaves from the gold family. I could match the patterned paper with a turquoise base but I was unsure if I could get the leaves on there. They seemed very out of place with the paper. After putzing around with it, I finally decided to use the stickers as a cluster and I just grabbed the focal element that I had already finished laying on my desk. The metallic of the embossed image on the focal tied the leaves into the card  so they didn't look so haphazard. 

On the inside of this card, I used up the last strip of blue vellum that I had cut off the first card and put a sentiment over it to cover up the tape. 

Now in conclusion, do I like all the cards? Not really. But I had a lot of fun and they're not all bad. I love the pink one and the last two. I'm not a fan of the first card because I just couldn't think of a greeting to go well with it. The yellow butterfly one seems a little "thrown together" to me. While I love that the foiling turned out so well, I wish I could have done a better job with the fence. That fence or gate was actually the back of a sticker so the side that is facing up is the shiny side...the side that nothing sticks to! So I couldn't stamp on it like I had planned to. I just overthought it.

Anyway, I hope this long wordy post was worth it for ya!
For those who are still locked down, keep it up, you're almost there! Stay at home and stay safe.
For those who are re-opening, stay safe and wear your mask for others beside yourself.
For those in New York State, we're getting there, people! Keep up the good work! Phase 2 will be here before you know it because we got this thing down!

-Wy

Thursday, February 22, 2018

It's Thursday! Tag!

February is always a rough month for me. It's STILL winter, it's still cold (usually), it's always gray, and it's always when I second guess everything. It doesn't help that it contains Valentine's Day, a useless holiday for me. (I'm not a romantic.) From February, Spring is still pretty far away and all I really do is plan for upcoming months. It's hard to keep my head in the moment when it's February.

Despite that, I love the amethyst birthstone and the fact that it's the shortest month of the year. In February, I also get pretty fed up with any disorganized messes I have and scrap piles that have been accumulating. I get the mood to "use it or lose it". It's the only month of the year that I get the urge to throw stuff away without regrets.

So it may not come as a surprise that I got something accomplished this week. With my mojo lacking (because it's February...duh...), I decided to just use stuff on my desk. I had a pile of tags awaiting some form of artwork so I went to work. I pulled every little baggie and box that held some kind of torn paper or ephemera.

Here's what I came up with:

 This bird is not quite finished. I don't know what it needs but it needs Something.


I'm trying to find a way to use the Back Chat stickers from Dyan Reaveley. I love them but I'm not a planner girl so I have to use them in art journaling and such. The bird just seemed to be throwing up his wings in frustration.


This butterfly tag is my favorite of the lot. I may not be able to part with it.

Ok, so I've had these minion notes on my desk for ages. My niece gave them to me,  I think. This one was just for fun.

Wow, can you believe the crap on my desk? I didn't even make a dent in it. I still have tags, too. Guess I'll have to wait for another day to play.

Have a great weekend!
-Wy

Tuesday, February 13, 2018

A Few More Cards

Just sharing some photos of a few more cards I've made recently.

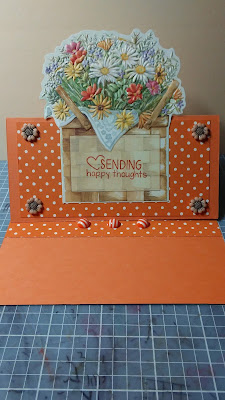
I find that the Easel Card is one of my favorites to do. It can be done in any size and it becomes it's own display with no fancy cutting...just a single fold in the middle.

Nothing really fancy here. I didn't even pull out the embossing heat tool. I just wanted to use up stuff and make something cool.

Enjoy the photos.


These cards aren't Easel cards but A2 sized.


The next two cards are square cards. I don't usually do square ones as they cost extra postage to mail but I had been gifted the card blanks. I thought the orange might be difficult to work with but I think I can make use of them. Really love the all-over butterfly card!


The square cards didn't come with envelopes so I will be figuring out how to make my own. So I'll have that to share with you soon.

See ya next post!
-Wy

Featured Post

The Chocolate Game

 Let's talk about something sweeter than my other blog posts of late. Let's talk chocolate. But no guarantees that anything I want t...